Stock Manager Advance RC3.0.2.0 (Documentation v1.2.4.3)
Thank you for purchasing the Stock Manager Advance
First of all, we would like to apologize for delays in releasing this version 3 and would like to thank everyone who has contributed to this item, including the Envato, beta testers, technical reviewers, friends, and my family members for their love and support in my work. We also thank the purchasers who have patiently been waiting for this update and who have given me lots of valuable feedback.
User Guide is not yet complete as the script is still in beta and will be update with each submission.
Public Beta
Due to the large number of changes to v3 we have decided to release it as a beta to collect user feedback. Please note that during this period based on user feedback we may make some changes to improve the item.
This release might still have issues in many countries with compliance of taxes and we will be listening to your feedback to solve them.
Update tool is not yet available and will be added to soon.
Installation Instruction
Requirements: Apache 2.2+, Mysql 5.4+, PHP 5.3+
- Copy/Upload the folder and files to your web server using cPanel or FTP
- If you are installing in sub folder, please make sure there is no space in folder names
- Create mysql database, database user and grant all permission to user for this database.
- Open the
http://yourdomain.com/pathtoupload/install/index.php - Step 1: Pre-install system checklist - If there is any issue with checklist, you will need to fix it first to proceed to next step.
- Step2: Provide you Envato Username and Purchase Code to validate the purchase.
- Step 3: Provide the database host, database user, database password and database name to proceed to next step.
Please make sure you don't have $ sign in your password. - Step 4: Site Config: Please Fill in you SMA Base URL and select your timezone.
You must check the site url as installer might guess it wrong- Base URL for public_html or www/htdocs folder will be
http://yourdomain.com/orhttp://localhost/ - Base URL for sub-domain will be
http://subdomain.yourdomain.com/ - Base URL for sub-folder will be
http://yourdomain.com/subfolder/orhttp://localhost/subfolder/ - Base URL must not have space and it should end with a trailing slash
- Base URL for public_html or www/htdocs folder will be
- If every thing goes smooth, You will be redirect to final page with login details.
- Remove the install folder before start using the SMA.
- Login using default username and password, and edit user to change login details.
- SMA is ready to use, after settings. Please save system settings and POS settings before start using it.
After Install
- Add new owner user before editing/deleting the default owner account (we have disabled the option to edit the logged in user email and user name, You won't be able edit/delete the default user unless you are logged in with new owner account).
- Add your currency.
- Edit the default biller to update you company details.
- Update the system settings, by selecting the default currency and accounting method. If you need over-selling (sell products even that are out of stock), you can only choose the AVCO as FIFO/LIFO won't work with over-selling.
- You are ready to go, start adding categories, taxes, warehouses, products, customer, sales and purchase.
Request Installation
We will provide the service to install the item for $10 To request the installation, please send $10 to [email protected] by Paypal or Skrill and email us your license file and hosting control panel details with reference of your payment to [email protected]
Updating from RC3.0.1.xx/RC3.0.2.xx to latest
- Extract the downloaded file.
- Copy RC3.0.2.xx/sma/config/migration.php, paste and replace the old file in yourinstallationdirectory/config/
- Copy RC3.0.2.xx/themes, paste and replace the old folder in yourinstallationdirectory/
- Copy RC3.0.2.xx/system, paste and replace the old folder in yourinstallationdirectory/
- Copy
- RC3.0.2.xx/sma/controllers
- RC3.0.2.xx/sma/core
- RC3.0.2.xx/sma/helpers
- RC3.0.2.xx/sma/language
- RC3.0.2.xx/sma/libraries
- RC3.0.2.xx/sma/migrations
- RC3.0.2.xx/sma/models
- Please copy the database changes from top to your current version and run in phpmyadmin after selecting your database.
-
Database changes are as following:
--RC3.0.2.4 Migration version 312
ALTER TABLE `sma_products`
    ADD `promotion` TINYINT(1) NULL DEFAULT 0,
    ADD `promo_price` DECIMAL(25,4) NULL DEFAULT NULL,
    ADD `start_date` DATE NULL,
    ADD `end_date` DATE NULL,
    ADD `supplier1_part_no` VARCHAR(50) NULL,
    ADD `supplier2_part_no` VARCHAR(50) NULL,
    ADD `supplier3_part_no` VARCHAR(50) NULL,
    ADD `supplier4_part_no` VARCHAR(50) NULL,
    ADD `supplier5_part_no` VARCHAR(50) NULL;
ALTER TABLE `sma_purchases`
    ADD `payment_term` TINYINT NULL,
    ADD `due_date` DATE NULL;
ALTER TABLE `sma_purchase_items`
    ADD `supplier_part_no` VARCHAR(50) NULL;
ALTER TABLE `sma_settings`
    ADD `barcode_separator` VARCHAR(2) NOT NULL DEFAULT '_';
ALTER TABLE `sma_permissions`
    ADD `bulk_actions` TINYINT(1) NOT NULL DEFAULT '0',
    ADD `customers-deposits` TINYINT(1) NOT NULL DEFAULT '0',
    ADD `customers-delete_deposit` TINYINT(1) NOT NULL DEFAULT '0';
ALTER TABLE `sma_companies` ADD `deposit_amount` DECIMAL(25,4) NULL;
CREATE TABLE IF NOT EXISTS `sma_deposits` (
    `id` int(11) NOT NULL AUTO_INCREMENT,
    `date` TIMESTAMP NOT NULL DEFAULT CURRENT_TIMESTAMP,
    `company_id` INT(11) NOT NULL,
    `amount` DECIMAL(25,4) NOT NULL,
    `paid_by` VARCHAR(50) NULL,
    `note` VARCHAR(255) NULL,
    `created_by` INT NOT NULL,
    `updated_by` INT NULL,
    `updated_at` DATETIME NULL,
    PRIMARY KEY (`id`)
) ENGINE=InnoDB  DEFAULT CHARSET=utf8 AUTO_INCREMENT=1;
UPDATE `sma_migrations` SET `version` = 312;

--RC3.0.2.3 FOR POS MODULE ONLY Migration version 311
ALTER TABLE `sma_pos_settings` ADD `after_sale_page` TINYINT(1) NULL DEFAULT '0',
 ADD `item_order` TINYINT(1) NULL DEFAULT '0';

--RC3.0.2.2 Migration version 310
ALTER TABLE `sma_settings` ADD `remove_expired` TINYINT(1) NULL DEFAULT '0' ;
ALTER TABLE `sma_users` ADD `allow_discount` TINYINT(1) NULL DEFAULT '0' ;
UPDATE `sma_migrations` SET `version` = 310;

--RC3.0.2.0 Migration version 309
ALTER TABLE `sma_users` ADD `view_right` TINYINT(1) NOT NULL DEFAULT '0', ADD `edit_right` TINYINT(1) NOT NULL DEFAULT '0';
ALTER TABLE `sma_purchase_items` ADD `quantity_received` DECIMAL(15,4) NULL ;
ALTER TABLE `sma_settings` ADD `display_symbol` TINYINT(1) NULL, ADD `symbol` VARCHAR(50) NULL;
ALTER TABLE `sma_permissions` ADD `products-adjustments` TINYINT(1) NOT NULL DEFAULT '0';
UPDATE `sma_migrations` SET `version` = 309;

-- RC3.0.1.16 Migration version 308
ALTER TABLE `sma_transfer_items` ADD `warehouse_id` INT NULL ;
ALTER TABLE `sma_settings` ADD `display_all_products` TINYINT(1) NULL DEFAULT '0' ;
UPDATE `sma_migrations` SET `version` = 308;

-- RC3.0.1.13 Migration version 307
ALTER TABLE `sma_settings` ADD `qty_decimals` TINYINT(1) NULL DEFAULT '2' ;
UPDATE `sma_migrations` SET `version` = 307;

-- RC3.0.1.13 Migration version 306
ALTER TABLE `sma_costing` CHANGE `quantity` `quantity` DECIMAL(15,4) NOT NULL,
 CHANGE `purchase_net_unit_cost` `purchase_net_unit_cost` DECIMAL(25,4) NULL DEFAULT NULL,
 CHANGE `purchase_unit_cost` `purchase_unit_cost` DECIMAL(25,4) NULL DEFAULT NULL,
 CHANGE `sale_net_unit_price` `sale_net_unit_price` DECIMAL(25,4) NOT NULL,
 CHANGE `sale_unit_price` `sale_unit_price` DECIMAL(25,4) NOT NULL,
 CHANGE `quantity_balance` `quantity_balance` DECIMAL(15,4) NULL DEFAULT NULL;
ALTER TABLE `sma_costing` ADD `option_id` INT NULL ;
ALTER TABLE `sma_sales` ADD `attachment` VARCHAR(55) NULL ;
ALTER TABLE `sma_quotes` ADD `attachment` VARCHAR(55) NULL ;
ALTER TABLE `sma_purchases` ADD `attachment` VARCHAR(55) NULL ;
ALTER TABLE `sma_transfers` ADD `attachment` VARCHAR(55) NULL ;
ALTER TABLE `sma_return_sales` ADD `attachment` VARCHAR(55) NULL ;
UPDATE `sma_migrations` SET `version` = 306;

-- RC3.0.1.7 Migration version 305
ALTER TABLE `sma_settings` ADD `sac` TINYINT(1) NULL DEFAULT '0' ;
ALTER TABLE `sma_sale_items` ADD `real_unit_price` DECIMAL(25,4) NULL DEFAULT '0' ;
ALTER TABLE `sma_quote_items` ADD `real_unit_price` DECIMAL(25,4) NULL DEFAULT '0' ;
ALTER TABLE `sma_return_items` ADD `real_unit_price` DECIMAL(25,4) NULL DEFAULT '0' ;
ALTER TABLE `sma_purchase_items` ADD `real_unit_cost` DECIMAL(25,4) NULL DEFAULT '0', ADD `unit_cost` DECIMAL(25,2) NULL ;
ALTER TABLE `sma_transfer_items` ADD `real_unit_cost` DECIMAL(25,4) NULL DEFAULT '0', ADD `unit_cost` DECIMAL(25,2) NULL, ADD `date` DATE NULL ;
UPDATE `sma_migrations` SET `version` = 305;
-- For POS Module
ALTER TABLE `sma_suspended_items` ADD `real_unit_price` DECIMAL(25,4) NULL DEFAULT '0' ;

-- RC3.0.1.4 Migration version 304
ALTER TABLE `sma_damage_products` ADD `type` VARCHAR(20) NOT NULL ;
ALTER TABLE `sma_damage_products` CHANGE `user` `created_by` INT(11) NULL DEFAULT NULL;
RENAME TABLE `sma_damage_products` TO `sma_adjustments`;
UPDATE `sma_migrations` SET `version` = 304;

-- For POS Module Migration version 304
ALTER TABLE `sma_pos_settings` ADD `purchase_code` VARCHAR(100) NULL DEFAULT 'purchase_code' ,
ADD `envato_username` VARCHAR(50) NULL DEFAULT 'envato_username' ,
ADD `version` VARCHAR(10) NULL DEFAULT '3.0.1.4' ;
UPDATE `sma_migrations` SET `version` = 304;

-- RC3.0.1.3 For POS Module Migration version 303
ALTER TABLE `sma_pos_register` ADD `total_cash_submitted` DECIMAL(25,4) NOT NULL ,
ADD `total_cheques_submitted` INT NOT NULL ,
ADD `total_cc_slips_submitted` INT NOT NULL ;
UPDATE `sma_migrations` SET `version` = 303;

-- RC3.0.1.2 Migration version 302
ALTER TABLE `sma_combo_items` ADD `unit_price` DECIMAL(25,4) NULL;
ALTER TABLE `sma_settings` ADD `expense_prefix` VARCHAR(20) NULL AFTER `return_prefix`;
ALTER TABLE `sma_order_ref` ADD `ex` INT(11) NOT NULL DEFAULT '1';
CREATE TABLE IF NOT EXISTS `sma_migrations` (
  `version` bigint(20) NOT NULL
) ENGINE=InnoDB DEFAULT CHARSET=utf8;
INSERT INTO `sma_migrations` (`version`) VALUES (302);
Please copy and paste all queries from your current version to the latest. - Login to your site and I hope that every thing will be fine.
Updating from V2.3
We suggest you to keep the current v2.3 as it is now for reference of old sale. If you can perform fresh installation of v3 to starting using the new features would be good. We understand that there might need to update from v2.3 to v3. We are adding the update tool to perform update still you need to keep the old installation of v2.3 as reference because of the incompatibility of old files/database/features.
We have added the update tool for testing purpose and feedback only. If you are advance user and have good command and experience of backup/restore (files &database) then you can try this update tool.
Please don't try this on your production version. Backup and restore the production version to different location and then try to update that. We are not providing any support for this at least for this version.
Please follow these steps to update from v2.3 to v3.
- Backup all your files and database. Save/download the backup.
- Save/download database config file (
sma/config/database.php) on your computer - Delete all old files/folders and upload all the new files/folders (from your downloaded file).
- Once all the files are uploaded. We need to update the datase configuratiuon to the newly uploaded database configuration file (
sma/config/databse.php) form the locally saved copy of database config file in step 2.You need to updated the hostname, username, password, database and set the db_debug to FALSE. - LETS UPDATE, UPDATE TOOL WON'T ASK FOR DATABASE CONFIG AS WE HAVE ALREADY UPDATED THE DATABASE SETTINGS.
- Open the browser and type
http://yourdomain.com/pathtoupload/update/index.php - Step 1: Pre-install system checklist - If there is any issue with checklist, you will need to fix it first to proceed to next step.
- Step 2: Provide your Envato Username and Purchase Code to validate and update your license.
- Step 3: Site Config: Please Fill in you SMA Base URL and select your timezone.
You must check the site url as installation tool can guess it wrong.This is the same base_url that you have in your old sma/config/config.php file- Base URL for public_html or www/htdocs folder will be
http://yourdomain.com/orhttp://localhost/ - Base URL for sub-domain will be
http://subdomain.yourdomain.com/ - Base URL for sub-folder will be
http://yourdomain.com/subfolder/orhttp://localhost/subfolder/ - Base URL must not have space and it should end with a trailing slash
- Base URL for public_html or www/htdocs folder will be
- If every thing goes smooth, You will be redirect to final page with update complete message.
- Remove the install and update folder from main folder before start using the SMA.
After Update
- Login using your old credentials.
- You will be redirected to the database synchronization page to import/correct the database for new version. Please press the button to perform actions
- Correct User Groups: The all user are set as owner, please use this button to set the correct user group of each user.
- Import Billers: Import your Billers
- Import Customers: Import your Customers
- Import Suppliers: Import your Suppliers
- Delete extra table: You can delete all unused tables in your database
These are optional, if you need to update the records or delete old data in these tables.
- Update Sales Table: To update the table paid, sale status = competed and payment status = paid
- Update Quotes Table: To update the table status = completed
- Update Purchases Table: To update the table paid, status = received and payment status = paid
- Update Transfers Table: To update the status = completed
OR
- Reset Sales Table: To reset/empty the table
- Reset Quotes Table: To reset/empty the table
- Reset Purchases Table: To reset/empty the table
- Reset Transfers Table: To reset/empty the table
- Reset Deliveries Table: To reset/empty the table
- Reset Products Table: To reset/empty the table (You can skip this to save the old products)
- Reset Damage Products Table: To reset/empty the table (You can skip this to save the old data)
- Add your currency.
- Update the system settings, by selecting the default currency and accounting method. If you need over-selling (sell products even that are out of stock), you can only choose the AVCO as FIFO/LIFO won't work with over-selling.
- You are ready to start using new version.
Request Update
We will provide the service to update your old SMA 2.3 to V3 for $20 To request the update, please send $20 to [email protected] by Paypal or Skrill and email us your license file and hosting control panel details with reference of your payment to [email protected]
Hardware
1. Receipt Printers:
We have tested the update V3 with Bixolon SRP-350II (USB) with Web Browser Printing and Java Applet by adding qz print plugin that will support these printers
- Samsung Bixolon SRP350plus, Bixolon SRP-350II and Bixolon SRP-270.
- Telly Dascom 1125 (USB)
- Epson Thermal Printer (COM)
- Eltron P310i
- Zebra GK420, Zebra P310, Zebra LP 2844 and Zebra TLP2844
- Citizen CT-S2000 (USB)
- DOS/LPT1 Printing
- Print directly to file: i.e. \serverprinter
- Nippon Primex
- Essae PR-85j
- Bematech MP200
Bixolon printers will work fine however you might need to change some commands for other printers. Please be informed that we can't provide support regarding any issues with plug-in. You will need to manage it by yourself.
2. Barcode Scanners/Readers:
Any of the barcode scanners/readers will work fine with v3 as long as it can read accurately.
3. Magnetic Card Readers:
Most of the Magnetic Card Readers will work fine. We have tested this with Uniform MSR213 Magnetic Stripe Card Reader (USB - 3 Track Reader).
For tablet/mobile card readers: No such feature and recommendation yet.
4. Cash Drawers:
You should buy the cash drawers that can be connected to pos printer. To use cash drawers, you printer should have the port to connect cash drawer as Bixolon SRP350II.
For Browser Print, you might need to set your printer to open cash drawer before printing.
For Java QZ Print, It will be fine as cash drawer will be opened with printing and can be opened without printing.
5. For barcode and label printing:
Any desktop laser print will work fine.
V2.3
There is no recommendation for V2.3 as we didn't test any hardware with that version but users reported that Bixolon SRP350II and Star Micronics TSP143UII printer working fine. For barcode scanner, you need to purchase programmable scanner and program it to send return command after typing the code.
Feature List V3
Stock Manager Advance (inventory and Invoicing system) is php-based web application that help you to manage your stock. All of the functionality that was in SMA v2.3 is also available through this release with the following enhancements:
- Inventory Accounting (FIFO/LIFO/AVCO)
- You can add your own themes or different view files
- New user interface design to ease many tasks (RTL language support is not available yet)
- Fixed PDF export issue with Chinese and Arabic languages (But these languages are not available yet)
- Ability to add new user groups
- Ability to add new customer groups
- Custom module permissions for user groups
- Added gift card features
- Multiple delete option for inventories, products, quotations, sales and transfers.
- Notifications Module
- Email protocol options (mail, sendmail and smtp)
- Multiple currencies (for front-end that will be added after this release)
- Products Module
- Improved barcode feature and attached barcode symbology to product
- Improved barcode/label printing feature
- Duplicate product option
- Product racks/locations
- Product Image Gallery
- Ability to set the images/thumbnails size
- Ability to add watermark to product images
- Attach tax rate with product
- Tax method to add tax inclusive/exclusive to the price and cost
- Attach multiple supplier to product
- Option for product expiry date while purchasing the stock
- Option to add/edit product quantity on add/edit product page
- Product variants with quantity tacking
- Users Module
- Assign users a warehouse and biller
- Own sales/quotations/purchases/transfers restrictions for users
- Customers Module
- Option to select customer group (to manage different selling rates)
- Re-structured the module to add users to customer company (front-end that will be added after this release)
- You can add customer group in settings to assign different product price to customer.
- Suppliers Module
- Re-structured the module to add users to supplier company (front-end that will be added after this release)
- Sales Module
- New add/edit page design
- Invoice view (Standard or Tax Invoice)
- Ability to add manual product to order list
- Ability to sell gift cards
- Ability to get paid by gift cards
- Ability to edit the product price on sale page
- Instant discount (add percentage or fixed discount to order and/or any product)
- Warehouse code/name/address on invoice
- Return sales and issue refunds
- Record payments to sale (full/partial with any no of payments)
- Add payment terms (No of pending payment days before the sale marked as due)
- Sale status (pending/completed)
- Payment status (pending/due/partially paid/fully paid))
- Email invoices with payment buttons (Paypal and Skrill)
- Reports Module
- Improved old reports
- Added product expiry alerts
- Added payments report
- Added profit and loss report
- Added customer report
- Added supplier report
- Added staff report
- Settings Module
- Manage user groups and permissions
- Manage customer groups
- Manage currencies
- Added option to upload map for warehouses
- Added option to upload images for categories and sub categories
- Added email templates (set email message in WYSIWYG editor)
- Added option to add tax code
- POS Module
- Add Item by Barcode scanner and code/name suggestion
- Ability to add manual product to order list
- Ability to sell gift cards
- Ability to edit the product price on sale page
- Instant discount (add percentage or fixed discount to order and/or any product)
- Rounding to nearest 0.05
- Option to add comment
- Record multiple payments to sale
- Payment Gateways (Paypal Pro and Stripe) for Credit Card Payment Processing
- Added Qz Printing Plug-in (Java Applet) to print and open cash drawer
- Added swipe credit card input
- Sell gift cards
- Pay by gift card
- Simple restriction for staff to not delete item in POS (POS will ask for password, that owner can set in POS Settings)
Live Demo For Stock Manager Advance v2.3 and v3.0
Demo Link for V3.0: http://tecdemo.com/sma3/
Demo Link for V2.3: http://tecdemo.com/sma2/
Login Details:
| Role | Username | Password |
|---|---|---|
| Owner | [email protected] | 12345678 |
| Admin | [email protected] | 12345678 |
| Purchasing staff | [email protected] | 12345678 |
| Sales staff | [email protected] | 12345678 |
| Viewer only user | [email protected] | 12345678 |
Role:               Username                 Password
Owner:              [email protected]       12345678
Admin:              [email protected]       12345678
Purchasing staff:   [email protected]   12345678
Sales staff:        [email protected]    12345678
Viewer only user:   [email protected]        12345678
In v3.0 you can add more user groups and set different permissions.
No Free Support anymore
Officially, we are not providing Free Support anymore but only paid support. We will be updating the item time to time for
- Fixes for bugs and reported issues with the item
- Updates to ensure on going compatibility and patch security vulnerabilities
No Free Support but only Paid
- Any help for customization - (We will charge for these type of question $5 per single question)
- No Free Installation services - (We will be charging $10 for installation)
- No Free help in resolving compatibility issues with 3rd party plug-ins, themes or items - (We will be charging $10-$50 for this type of requests)
- No Free help with included 3rd party items from the 3rd party author (e.g, plug-ins and libraries used in script and theme) - (We will be charging $10-$50 for this type of requests)
- No Free help with your particular web hosting/server environment - (We will be charging $10-$50 for this type of requests)
Paid Support Hours:
At $5 per email/ticket and only 1 question per email/ticket
From 0900 – 1800 (GMT+8), Mondays – Fridays
(Response time: 12 – 48 Hours)
No responses on Saturday, Sunday and Public Holidays in Malaysia
If you are having any difficulty in understanding the item functionality or you have any question. Please try to have a look at FAQs, User Guide and Developer Guide and if can't find the answer in FAQs, User Guide and Developer Guide, we encourage you to contact us by emailing to [email protected]
Custom Modifications
Yes, we do provide customization services to modify/enhance the item functionality to suit your needs. We charge $30 per hour. Please email to [email protected] to check availability, estimated cost and time.
Feature Request
Yes, we would love to listen your requests/feedback. Please prepare the details with examples before emailing to [email protected]
Languages
We are very thankful to these amazing people who have contributed their language files.
V3
Only English available for v3.0 and other languages will be added soon.
V2.3
Currently, the following languages are available (Fully or Partially). English, French, Indonesia, Thai, Spanish, Romanian, Spanish, Brazilian Portuguese, European Portuguese and Czech.
A big thanks to Arismendi Dario, Philippe Gianesin, Julis Suryadi from SendawarMedia, Carlos Sanchez, Nuno Filipe, Alex from MixedIn Radio, Mateus Vitorino, Cristian Valluzzi, Saed A. Haroon and Evren COMERT for contributing the v2.3 language files.
If you need to add your own language that will be very easy. Please find the instruction in developer guide.
If you have translated the files and willing to contribute so that others can enjoy your generosity, please email the translated files to [email protected]
Credits
Thanks to all great people who are developing open source software.
- CodeIgniter - PHP-Framework under MIT License
- Ion_auth - A simple, lightweight authentication library by Ben Edmunds under the Apache License v2
- mPDF - A PHP class to generate PDF under GNU General Public License version 2
- Bootstrap - Most popular HTML, CSS, and JS framework under MIT License
- jQuery - A fast, small, and feature-rich JavaScript library under MIT License
- Font Awesome - The iconic font and CSS toolkit under GPL License.
- DataTables - A plug-in for the jQuery under two licenses: GPL v2 license or a BSD (3-point) License
- PHPExcel - A simple PHP to Excel conversion under GNU Library General Public License (LGPLv2.1)
- Zend Framework 1 (barcode library) - under New BSD License
- PHP QR Code - Generator for 2-D QR barcode under GNU Library or Lesser General Public License version 3.0 (LGPLv3)
- Bootstrap-datetimepicker - Date and Time picker widget based on bootstrap under Apache License V2
- Bootstrap-daterangepicker - DDate range picker component for Bootstrap under MIT License V2
- Bootstrap 3 Lightbox - A lightbox gallery under GNU GENERAL PUBLIC LICENSE V2
- iCheck - Highly customizable checkboxes and radio buttons under MIT License
- Accounting.js - A tiny JavaScript library for number, money and currency formatting under MIT License
- jQuery Cookie - A simple, lightweight jQuery plugin to manage cookies under MIT License
- Commercial Licenses
- Highcharts
- BootstrapValidator
- Redactor Text Editor
Thanks to all the friends for their suggestions, feedback and help.
Frequently Asked Questions
General
-
How many products can be managed with this Stock Manager?
You can have any number of products ranging from 1 to 20,000 or more.
-
How to enable HTTPS support?
You can easily enable https by editing the 2 lines in config file (
sma/config/config.php) as following:- Update base url from
http://yoursite.comtohttps://yoursite.com - Set
$config['cookie_secure']to TRUE
- Update base url from
-
Can I modify the item?
Yes, you can modify the script as per your needs and license.
We offer Regular License only that allows you to use the Item to create one single End Product for yourself or for one client (a “single application”). If you have more then once clients, you will need to purchase separate license for each client.
You can visit this link to licensing faqs page of Evnato marketplace.
-
Can I manage multiple warehouses/stores?
Yes, you can easily manage multiple warehouse/stores with same product base.
However, if you have different products in each warehouse/store, you can add all products for each warehouse/store (combine products for all warehouse) and then manage multiple warehouse/stores.
OR
You will be buy separate license and install SMA separately for each warehouse/store. -
Can I white label it to have my company name and logo?
Yes, you can. Please update the settings with site name and the logo can be uploaded by visiting the change logo menu link under settings.
-
How can I change the biller/invoice logo?
Please upload the biller logo by visiting the change logo menu link under settings. Once logo upload, please edit the biller and choose new logo to update the biller.
-
How can I translate into other language?
You can easily add new languages to SMA. Please click here to jump to guide.
-
Can I install this item on localhost with wamp/xampp/easyphp?
You can install this item on localhost with any web platform xampp, mamp, lamp, wamp or easyphp. Internet connectivity is required for installation to verify the purchase. Once installed, you can use it without Internet.
-
Does it supports my barcode scanner/receipt printer/magnetic card reader?
Please click here to jump to hardware section.
-
Will I get the full source code?
Yes, you will get 100% source code including php, js, html and css.
-
Can I modify it as per my needs?
Yes, you modify it as per your need and license.
-
Are you using a PHP Framework for this item?
Yes, CodeIgniter – PHP Framework created by EllisLab and is now a project of the British Columbia Institute of Technology.
-
How do SMA handle out bounds?
Products will be automatically subtracted from the warehouse quantity once the invoice created with completed sale status. Sale with pending status will not change the quantity.
-
How do SMA handle in bounds?
New Purchase will automatically add/increase the product quantity in the selected warehouse.
-
Why I can sell the products even if I don't have stock in warehouse?
Please check the overselling option in system settings, that would be enabled. You can disable overselling to stop selling products with 0 or lower stock.
-
Why the products price is different on sales page?
Please check the customer group and products tax.
-
What is the mpdf password to edit the pdf documents?
We haven't set any password. You can set it as you like. You can set password by editing the sma/libraries/sma.php around line no 217
$pdf->SetProtection(array('print'));replace with$pdf->SetProtection(array('print'), 'user_password', 'owner_password');If you need more information, please visit mpdf documentation. -
How can I set the theme style?
Not every theme will have different style option, the default theme have 3 menu color styles and can only be chosen from the top bar.
-
What is the difference between inclusive and exclusive tax on add product page?
Inclusive tax method means that tax is already included in the price. Exclusive tax method means that tax is not included in the price and should be calculated/added separately.
For example:
Product Price 100 and Tax 10%

												Inclusive tax method: Price 90.91 and Tax amount: 9.09 = 100 (total price with tax)

Exclusive tax method: Price 100 and Tax amount: 10 = 110 (total price with tax) -
Where are the header and footer view files?
The header and footer files are in
themes/default/views/ -
How can I change Quick Cash buttons?
Please modify the pos_lang.php in sma/language/english/. If you are not using English then see the file in sma/language/yourLanguageFolder/
-
Why POS brings me to Java page OR my browser keep blocking the Java?
If you have enable the Java applet and added your domain to Exception Site List as said in the POS settings page.
- You are being redirect to Java page, please download the new Java installer and install it.
- Your browser blocking the Java applet even is you have already added the domain to Java Exception Site List, please allow it in your browser.
- Your get qz plug-in not loaded error message, please check if the browser is not blocking the Java. Restoring the security prompts in Java Security might help.
- Browser keep loading the page and never stop, your java is stop responding, please open task manage and kill jp2launcher.exe/Java/Plugin Container and reload the page. If still same, please Restoring Security Prompts in Java Security settings.
You think, this is giving too much trouble, please disable the Java applet in POS settings and let browser handle printing.
-
Why barcode images are not showing on print barcode and label page?
Please check that ini_set function is not disabled. The ini_set function should be enabled to use barcode feature.
-
How can I set the reference numbers to start from my own number?
Please go to phpmyadmin, select your database, select the order_ref table and here you can set your own number. You need to change
- so : To change the sale orders reference number.
- qu : To change the quotations reference number.
- po : To change the purchase orders reference number.
- to : To change the transfer order reference number.
- pos : To change the pos sale reference number.
- do : To change the delivery order number.
- pay : To change the payments reference number.
- re : To change the return sales reference number.
This is useful for first time and these will be automatically reset with corn job depending your reference format in system settings.
-
How does discount applied to the products and order?
Product level discount will be applied on the product price before any tax calculation.
i.e, Prodict Price - Product Discount + Product Tax (product tax calcuated on Prodict Price - Product Discount)Order level discount will be applied on the order total (total + product price) before any order tax calculation.
i.e, Order Total - Order Discount + Order Tax (order tax calcuated on Order Total - Order Discount)
Account and Users
-
What type of account are available?
These are the account type
- Management or Staff
- Owner
- Admin
- You can add more user groups for your settings and set permissions to any of these groups.
- Customer
- Supplier
- Management or Staff
-
What user groups available?
These user groups are fixed and can't be changed.
- Owner
- Admin
- Customer
- Supplier
You can add more user groups for your settings. These all groups will be consider as staff groups and you can set permissions to any of these groups.
-
User forgot his/her password. How do I reset it?
For Staff: Please visit list user and edit the user to reset the password. For Customer/Supplier: Please visit list customers/suppliers and then click the users icon to list the user for selected customer/supplier. You can edit any user to reset password.
-
How do I delete account?
If you want to delete account for staff member, please visit list users sub menu under people main menu. All the account are listed on this page and you can delete any of them.
If you want to delete any account customer/supplier account, please visit list customers/suppliers sub menu under people main menu. All the customers/suppliers are listed on this page. Now click the users icon to list the account for the customer/supplier. On this window, you can delete any account for this customer/suppler.
If you delete any customer/supplier, all the account attached with the customer/supplier will automatically deleted.
Payments
-
What payment gateways are available in SMA?
Payment options available for customers to choose from are as following:
- Paypal
- Skrill
Payment options has been added to V3 that will be available to customers when you email invoice to them. Customers would be able to make payment by this gateway using link in email and from front-end (once available).
There is no payment option available in V2.3
-
What payment gateways are available in POS Module for SMA?
Payment options available to process the credit card for POS Modules are as following:
- Paypal Pro
- Stripe
Payments will be proceed after you submit the sale from POS and this could take a few second extra then the normal POS sale.
There is no payment option available in V2.3
-
Can I have recurring invoice or subscription?
No, currently there is no such feature available yet.
-
Why did my PayPal Pro or Stripe payment take long time?
API calls to both server could take few seconds as the payment is processed after submit.
-
Will you be adding more payment gateways?
Yes, we will be exploring the new gateways.
-
Paypal Pro and Stripe gateways are added to SMA or POS?
Paypal Pro and Stripe gateways are only available with POS Module. If you have purchase SMA with POS Module. These are already included in you POS.
If you have purchase Stock Manager Advance only then you don't have the Paypal Pro and Stripe gateways but only the Paypal and Skrill button on email and client portal.
Error
-
Why am I getting CloudFlare Security or Blank error on verfication while installating the item?
If you are not getting any error but blank red alert or CloudFlare Security error mean your request is no reaching to verification server. Please check that you server is not blocking the curl request and secondly there are chances that CloudFlare might be challenging your request due to various reasons. Please check with your host and request them to white list CloudFlare ips https://www.cloudflare.com/ips
Updating your Anti-Virus and Browser might help. You can check with your host too.
You can try different host and/or install it locally with any web platform easyphp/lamp/mamp/wamp/xampp.
-
Why I am getting "no input specified" error after install/update?
Please add the ? 'question sign' after index.php in the .htaccess file, you line will be look as
RewriteRule ^(.*)$ /index.php?$1 [L]code.For more information, please visit this guide page.
-
Why the installer/update tool is locked?
After successfully installation/update, the installer/update tool will be automatically locked.
If you having any issue after installation or like to perform the installation again, please upload the files again.
-
Why am I getting 404/500 error page after installation?
Please
- make sure that your apache mod_rewite is enabled
- check that .htaccess file is successfully uploaded and exists in the main directory of SMA
- base_url in sma/config/config.php
- check your database settings in sma/config/database.php
- check your folders/files permissions (folders should have 755 and files should have 644 permissions).
If you are using godaddy, please visit the codeigniter official guide here. You might need to check and modify you .htaccess files too.
You can always check your error log to get more information about the issue.
-
Why sale time is different from my computer time?
The time with Javascript and PHP could be different as javascript use your computer time but php will use your server time.
Please check your timezone in index.php and make sure that you have set the correct time zone. You can find your timezone at http://php.net/manual/en/timezones.php
-
Why I can't download the pdf?
We have used mPDF library to generate pdf files. We have tested mPDF library on 5 different servers. Yes, it is a bit slower but do the amazing job to convert html to pdf. You can check with your host about this and if you need requirement, please click here
Please increase the
memory limitto 128MB as mPDF needs quite a lot memory to generate pdf files. -
Why I can't send emails?
We have tested the email function on different hosting servers. Please check with your host about this and if you need to check the code that will be in sma/libraries/sma.php and look for
send_email() -
Why I can't login and getting time out error?
Timeout feature has been enabled. The user will be timed out after 3 unsuccessful login attempts for 10 minutes. You can disabled this in sma/config/ion_auth.php by changing the
$config['track_login_attempts'] = TRUE;to$config['track_login_attempts'] = FALSE;or you can increase the attempts from 3 to any number you like. -
Why I can't upload any file and the Barcode & QRCode images are not showing?
This could be due to permission on the assets/uploads. Please set 777 permission to assets/uploads and all other folder in the assets/uploads/
-
Why I getting db error and can't login?
Please check your db configuration in sma/config/database.php
-
Can I use this on Windows server with IIS?
Yes but we haven't tested this and don't provide any support for setup.
If URL Rewrite module is not installed, please install it from here http://www.iis.net/downloads/microsoft/url-rewrite. Please check the complete web.config file. Place this in the main installation folder where the index.php is placed.
<?xml version="1.0" encoding="UTF-8"?> <configuration> <system.webServer> <rewrite> <rules> <rule name="Imported Rule 1" stopProcessing="true"> <match url="^(.*)$" ignoreCase="false" /> <conditions logicalGrouping="MatchAll"> <add input="{REQUEST_FILENAME}" matchType="IsDirectory" negate="true" /> <add input="{REQUEST_FILENAME}" matchType="IsFile" negate="true" /> </conditions> <action type="Rewrite" url="index.php?url={R:1}" appendQueryString="true" /> </rule> </rules> </rewrite> </system.webServer> </configuration> -
Can I use this with NGINX?
Yes but we haven't tested this and don't provide any support for setup.
You can follow the guide http://wiki.nginx.org/Codeigniter. Your nginx.conf file will look like this.
server { server_name domain.tld; root /var/www/codeignitor; index index.html index.php; # set expiration of assets to MAX for caching location ~* \.(ico|css|js|gif|jpe?g|png)(\?[0-9]+)?$ { expires max; log_not_found off; } location / { # Check if a file or directory index file exists, else route it to index.php. try_files $uri $uri/ /index.php; } location ~* \.php$ { fastcgi_pass 127.0.0.1:9000; include fastcgi.conf; } location ~ /files { deny all; return 404; } } -
Why some products are missing from order when I add 100+ products?
There is no restriction in SMA code on the number of order items. If you are having such issue, please check your php configuration file (php.ini) for
max_input_varsand set it to higher number i.e, 10000. -
Why Wordpress showing 404 page when I access the SMA?
You can exclude sub-directory from RewriteRule of wordpress by adding the line below to your .htaccess file in main directory of wordpress.
RewriteCond %{REQUEST_URI} !^/(mydir|mydir/.*)$
User Guide
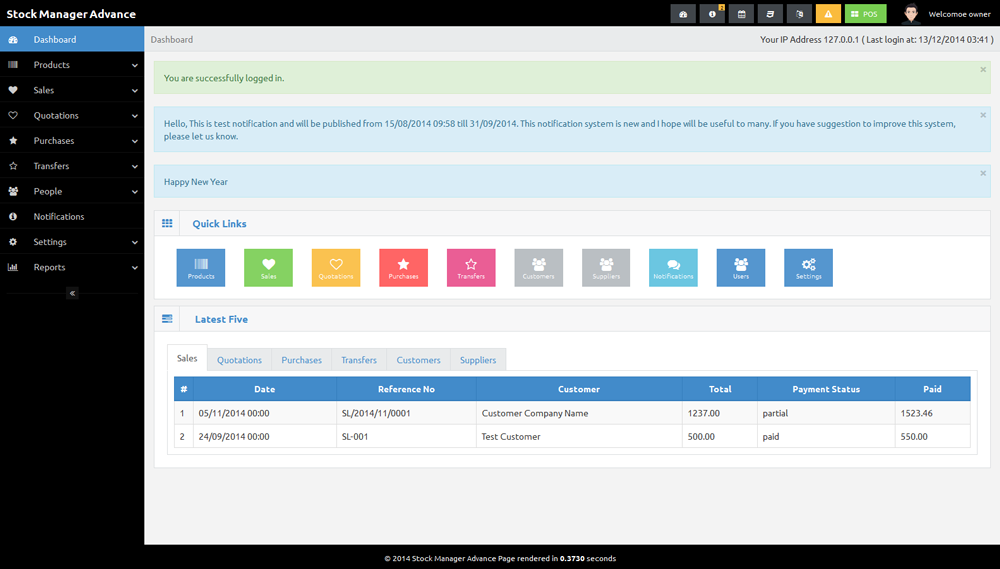
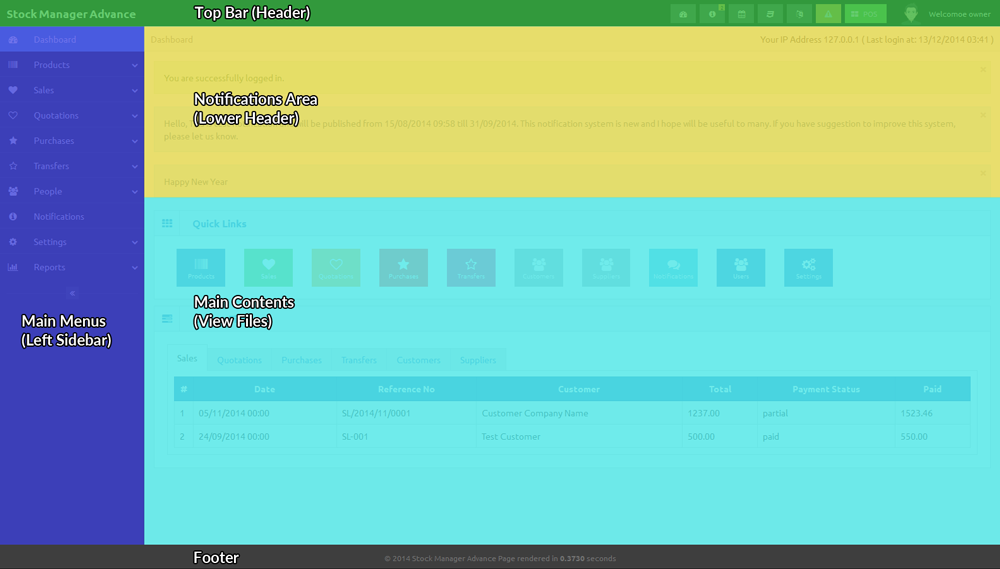
As V3 comes with new theme, let me explain the main sections of the home screen. We am add image of the dashboard and on right with overlay to name the main sections of the page. This sections are same through for each and every page. Only the main content area will be different for pages and will be displaying the view files from your theme folder.
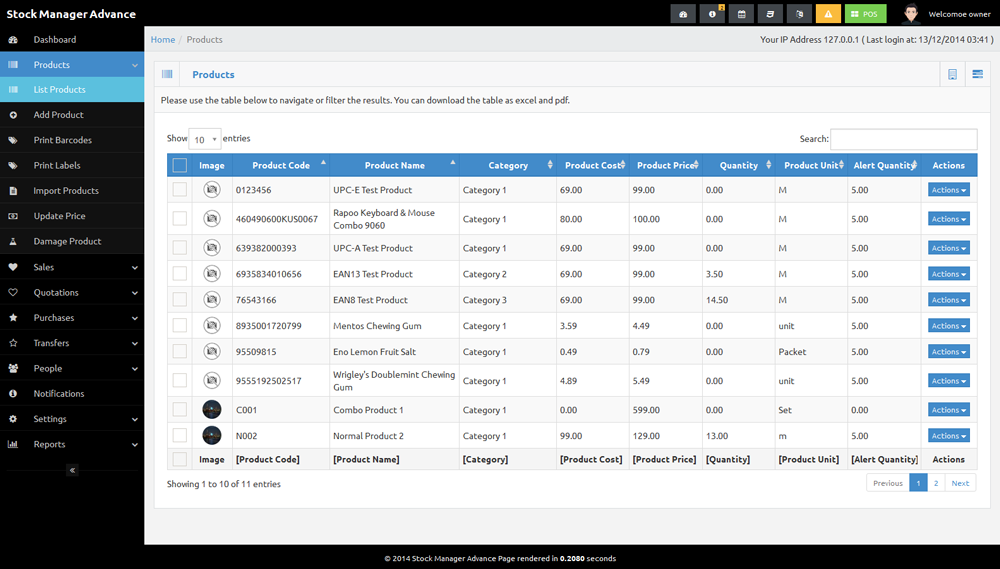
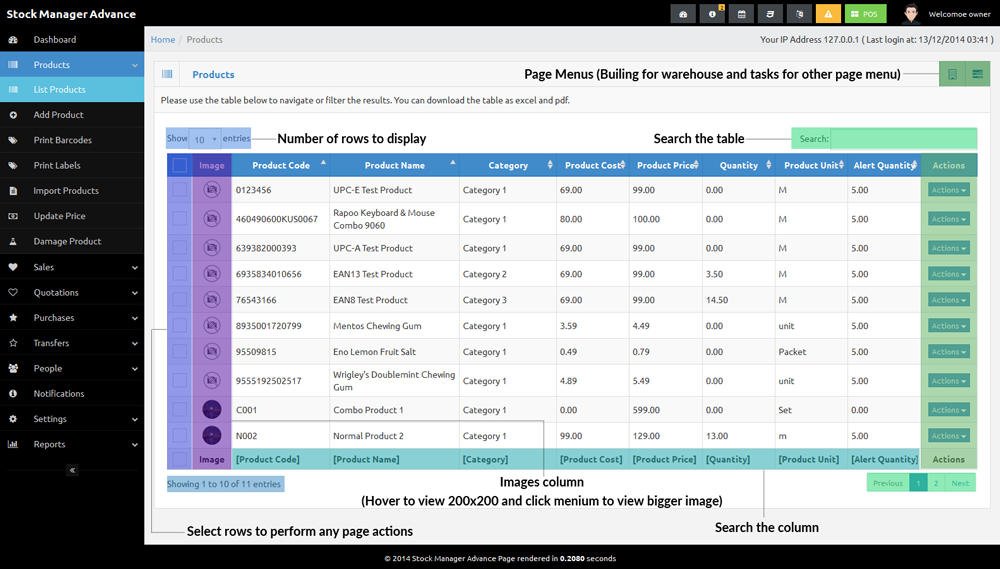
New listing pages comes with new page menu position, select row column and Image column (where applicable). We have added the listing page and overlay page to explain the new sections. You can see the new menu position in top left of main content area. Building icon is to list the warehouse and the tasks icon for other page menus, will work with select row.
In V3, main menus (left side) has been updated to track the active page and breadcrumb has been added on top of the main content area.
These are the menus in V3
Users
Users are the staff members (your employees). You can add any number of users and assign them group (manager groups and permissions in settings), biller and warehouse.
Owner and Admin user groups are with fixed permissions and any other user group added by you, can have custom permissions.
User/Staff rewards are not yet available and will be added in version v3.1
The users added in customer/supplier modules will be saved in this table too but you need to edit/manage them from their modules.
Timeout feature has been enabled. The user will be timed out after 3 unsuccessful login attempts for 10 minutes. You can disabled this in sma/config/ion_auth.php by changing the
$config['track_login_attempts'] = TRUE;
to
$config['track_login_attempts'] = FALSE;
or you can increase the attempts from 3 to any number you like.
Billers
Billers are the selling companies, you can sell/quote/invoice your customers with any biller, means you can have multiple companies and can assign any of these to your staff so that all of their sale will be under assigned billing company.
Only users with owner group rights can add billers. Logo, Company, Name (Contact Person), Email, Phone, Address and City input fields are required.
This module is simple to use and manage the biller. The interface is quite easy to understand. The logos can be uploaded by visiting the change logo under settings and once uploaded you need to edit the biller to set the new logo.
Customers
Customers are the clients, purchases of the items that you/your companies sell. This module has been updated and now you can add customer groups in settings i.e, Normal Customer, Regular Customer, Resellers, Distributors etc and assign percentage increment to the price depending on their group.
Company, Name (Contact Person), Email, Phone, Address and City input fields are required. You can add extra information about the customer as there are 6 custom fields and the select box in front of each custom field is to display this information on invoices/quotations.
The inputs for customer in other modules are no more select/drop down but ajax calls, you can type in search filed to get the suggestions and select any suggestion available in database for customers. You can add customer by clicking the Add Customer menu under People from any page. The interface is quite easy to understand.
Suppliers
Suppliers are the vendors/suppling companies, the companies from you buy your stock/items.
Company, Name (Contact Person), Email, Phone, Address and City input fields are required. You can add extra information about the customer as there are 6 custom fields and the select box in front of each custom field is to display this information on purchases.
The inputs for supplier in other modules (purchases and products) are no more select/drop down but ajax calls, you can type in search filed to get the suggestions and select any suggestion available in database for supplier. You can add supplier by clicking the Add Supplier menu under People from any page. The interface is almost same as billers and customers, easy to use.
Products
Products are the items that you sell to your customer. This modules has been updated and has many new options/features. There are new menus for each product on List Products page. The icon menus has been replace with the drop down menus.
There are 4 types to choose for the product,
- Standard: These are the standard product like phone, ram, speakers etc.
- Combo: These are products that consist of more that 1 product in your stock like computer with Casing, RAM and Speakers as combo items.
- Digital: These are the digital products that can be downloaded only like software, movies, pdf tutorials etc.
- Service: This are service as checking/repairing fee for the computer.
Now you can assign the barcode symbology, product tax, tax method and supplier (up to 5 with their price) to each product. You can select the main product images and multiple product gallery images. You even can add the current stock for each warehouse.
The product details will be displayed on view product page and the product details for invoice will be displayed on the invoice under this items.
Product variants: This module have new option for product variants. You can add any number product variants/attributes and these will be tracked automatically on purchase/sale. There print barcode/label page for each products will show the new barcode image if there is variants available for the product. This will help you to manage the products well specially for those who need to track the products attribute i.e, sizes and color etc.
If your product have nested variants, then you can add the as Red Size 5, Yellow size 6 etc. You need to add these only once for each product.
Barcodes and Labels: The main menu link to print the barcode and labels of the products are same as in v2.3 These links won't print the variants barcode images. To print the barcode images with product variants, you need to print for a single product, with product actions or the link on product detail page.
Import product and update price with csv file: The instructions are available on the pages.
The option to add (product and variants) quantity to the warehouse is available on add product page but we recommend you to not use this. Instead you can add all products and their variants with 0 quantity then add purchase to update the stock for (products and their variants) to the warehouse.
Purchases
Purchases (Inventories) to update the stock of your products. Adding purchase will automatically increase the product quantity in the selected warehouse. List purchases page have these drop down menus in the actions column.
Add Purchase page has been redesigned. There is only single input field to add the products to order list. You can type the product name or code to get the suggestion and the select the suggestion or just scan the barcode with your barcode scanner to add product to the order list. If there is only 1 suggestion for your typed characters then it will automatically added to the order list.
Add product to order list and the totals will be automatically stick top and bottom once the order list reached the number that you have in settings for Product counts to fix for barcode input.
Please select more options to add the order tax, discount and shipping. You even can add purchase by csv files by visiting the Add Purchase by CSV in main menus under Purchases.
You even can add standard product to your database by clicking the + icon at the end of add product to order list input.
Sales
Sales (Invoices) to manage the sales and payments received. Add sale will automatically decrease the product quantity from the selected warehouse. If your product have variants that will be synchronized too. List sales page have these drop down menus in the actions column for each sale.
Add Sale page has been redesigned to and are similar to add purchase. There is only single input field to add the products to order list. You can type the product name or code to get the suggestion and the select the suggestion or just scan the barcode with your barcode scanner to add product to the order list. If there is only 1 suggestion for your typed characters then it will automatically added to the order list. If you have scanned the barcode with option, the order item option will automatically set to the scanned barcode option.
Add product to order list and the totals will be automatically stick top and bottom once the order list reached the number that you have in settings for Product counts to fix for barcode input.
Payment terms are the number of days before this sale marked as due. This value should be an integer 14 for 14 days payment term and 30 for 1 month etc.
There are 2 sale status
- Pending: The sale is added but the items has not been handed-over/delivered to the customer.
- Completed: The sale us added and the products has been sent/handed-over/proceed for delivery.
You can have partial payments for sales. There are 4 payment status
- Pending: The payment has not yet received.
- Due: The payment term had been reached but the payment has not yet received.
- Partial: Customer has made the partial payment and there is balance that still need to pay by customer.
- Paid: The payment for the sale has been completely paid.
There are 2 icon links at the end of add product to order list input.
- icon: To add the product to the order list manually, this won't be added to the database but only to the sale.
- icon: To add the gift card to database and sell by adding to the order list.
To edit or delete any payment, please click the view payments link in actions on sales list or in page menu on sale view page.
If any of the product in order list is red that means the product or selected variant is out of stock or warehouse quantity is lesser then ordered quantity (you can change the product variant or reduce the quantity). If over-selling is disabled, it will produce error on submit.
Why sale price is higher than the price on list product page?
Please check the customer groups for that customer. The customer groups allow you to set the percentage (%) addition/deduction to the product price for that group of customers.
Quotations
Quotations modules is almost same as in v2.3. The only change is add quotation page redesign that is similar to the add sale page with the following status
- Pending: The quotation has been generated but not yet sent to customer.
- Sent: The quotation had been generated and sent to the customer. Emailing the quotation will automatically change the status to sent.
- Completed: The sale had been generated for this quotation. Add invoice link on the quotation menu will automatically change the status to complete once the sale generated.
Transfers
If you have multiple warehouses/stores, you might need to transfer/move item from one to another. This module will help to manage these tasks. You can add transfer to record the transfer details.
There are 3 transfer status
- Pending: The transfer is added but the products are not yet sent so no inventory action will be performed.
- Sent: The transfer is added and products has been sent but not yet reached the destination so the items have been checked from the sending warehouse but not yet add/updated to the destination warehouse.
- Completed: The transfer is added and products has been sent by from warehouse and received in to warehouse so the item have be subtracted from sending rehouse and add/update in the destination warehouse.
Settings
Please add your default currency and save your settings first. You need to set default currency and accounting method before using this system.
The default currency is very important to set before any sale as this this would destroy the costing if you set if after sales.
Let me explain the system settings page. In main content area, there are Skill and Paypal settings links in the end of the box heading System Settings.
- Site Configuration
- Site Name: Input for the site name (what ever you want to call this system).
- Language: Option to select system default language.
- Default Currency: Option to select system default currency (THIS SHOULD BE SAVED BEFORE ADDING ANY DATA).
- Accounting Method: There are 3 methods available
- FIFO (First In First Out): FIFO inventory costing method will not work with over selling.
- LIFO (Last In First Out): LIFO inventory costing method will not work with over selling too.
- AVCO (Average Cost Method): AVCO is the only method that you can use with over selling enabled.
- Default Email: Input for system default email, all email will be sent from this email address.
- Default Customer Group: Option to select default customer group.
- Maintenance Mode: Option to enable or disable offline mode.
- Theme: Option to select theme.
- Login Captcha: Option to enable login captcha.
- Rows per page: Option to show the no of record in table on each listing page.
- Date Format: Option to select date format.
- Timezone: Option to choose your timezone. This is AC input just type your continent/city and choose it fro suggestion.
- Allow Registration: Option to allow customer to register account.
- Registration Verification: Option to enable email verification for customer register accounts.
- Registration Notification: Option to enable notifications for registration.
- Calendar: Option to choose calendar privacy, Shared or Private.
- Default Warehouse: Option to select the default warehouse, this will be auto selected for owner on add sale/purchase/quotation/transfer page.
- Products
- Product Tax: Option to enable/disable product level tax.
- Racks: Option to enable/disable product rack feature.
- Product Variants: Option to enable/disable product variants (attributes) feature.
- Product Expiry: Option to enable/disable product expiry date feature.
- image Size: Option to set image sizes that can be uploaded
- Thumbnail Size: Option to set thumbnail size (50-80).
- Watermark: Option to enable/disable watermark on product images, water mark text will be your site name.
- Sales
- Over Selling: Option to enable over selling, this option only can work with AVCO accounting method, enabling this will automatically change the account method to AVCO (if it was FIFO or LIFO).
- Reference Format: Option to select the reference format.
- Order Tax: Option to enable/disable order level tax.
- Product Level Discount: Option to enable/disable product level discount.
- Product Serial: Option to enable product serial input on sale.
- Auto Detect Barcode: Option to enable/disable auto detection for barcode.
- Product count to fix barcode input: No of the row on add sale/quotation/purchase/transfer page to fix the product input and totals to top and bottom.
- Cart Item Addition Method: Option to select the method to add items to order list, You must select Add New Item to Cart if your products have variants.
- Invoice View: You can switch the invoice layout to Standard or Tax Invoice.
- Prefix
- Sales Reference Prefix: Option to set sale reference prefix.
- Return Reference Prefix: Option to set return sale reference prefix.
- Payment Reference Prefix: Option to set payment reference prefix.
- Delivery Reference Prefix: Option to set delivery reference prefix.
- Quotation Reference Prefix: Option to quotation sale reference prefix.
- Purchase Reference Prefix: Option to set purchase reference prefix.
- Transfer Reference Prefix: Option to set transfer reference prefix.
- Money and Number Format
- Decimals: Option to set number of decimals, 0 to disable decimals.
- Decimals Separator: Option to set decimals separator.
- Thousand Separator: Option to set the thousands separator.
- Email
- Email Protocol: Option to select email sending protocol.
- PHP Mail Function: Send email using default php mail function.
- Send Mail: Send email using sendmail and the default mailpath is /usr/sbin/sendmail
- SMTP: Requires extra information and the default time out is 5 seconds.
- SMTP Host: SMTP Server Address
- SMTP User: SMTP Username
- SMTP Password: SMTP Password
- SMTP Port: SMTP Port
- Email Protocol: Option to select email sending protocol.
You can manage currencies, categories, sub-categories, taxes, warehouses, customer groups, email templates, user groups and permissions. In the admin area all the price are in default currency and this multiple currency feature is just for front end that will be added later.
Reports
The following reports are available
- Overview Chart: Main reports page with links to all other reports and the overview chart.
- Warehouse Stock Chart: Warehouse stock report, you can choose the warehouse in page menus.
- Product Quantity Alerts: The list of products that are reached the alert quantity and need to be purchased.
- Product Expiry Alerts: The list of products that are about to expire in less that 90 days.
- Product Reports: For customized product report, you can click the icon at page menu for customize the report.
- Daily Sales: Calendar with daily sales
- Monthly Sales: Calendar with monthly sales
- Sales Report: For customized sales report, you can click the icon at the page menu for customize the report.
- Payment Report: For payment report, you can click the icon at the page menu for customize the report.
- Profit and/or Loss: Profit and/or Loss report for the selected time frame (date range).
- Purchase Report: For customized purchase report, you can click the icon at the page menu for customize the report.
- Customer Report: For customer report, you can click the icon at the page menu for customize the report.
- Supplier Report: For supplier report, you can click the icon at the page menu for customize the report.
- Staff Report: For staff report, you can click the icon at the page menu for customize the report.
Developer Guide
As you know SMA is developed with CodeIgniter PHP Framework and you can find the user guide for framework at http://www.codeigniter.com/user_guide/ Most of the times this will be handy resource for you to check for guide/code/snippets on this user guide.
Please always backup your files and database before editing them.
We didn't add any comment in code. All the methods/functions are on same pattern described here.
I am illustrating the page function here with comment so that you can have idea how these pages are working. In controller class, each method/function present a page. In this example, the controller class is comments and the method/function is add page. The code will handle the add page and the view files will in your theme/comments/add.php
You can check the user group permission by calling the sma library's checkPermissions() You even can set your own custom permissions. The available variables are $this->Owner, $this->Admin, $this->Customer and $this->Supplier in all controllers and $Owner, $Admin, $Customer and $Supplier in all view files (if you passed them the $this->data)
You can set the flash messages as $this->session->set_flashdata('item', 'value'); and item as
- 'message' for success message
- 'error' for any error
- 'warning' for any warning alert
Input variables are mostly not defined in controller's page function. So you need to check the view files for inputs. But in some pages, these are defined in controller too.
For validation rules, you might need to check the controller as we doing in this example. But there are some rules that are defined in form_validation.php in sma/config/ folder. You might need to check this form_validation.php for your page. As we don't passing any variable to $this->form_validation->run() so the array will be comments/add. Below in removing the required from field if ($this->form_validation->run('companies/add') == true) {, we need to check companies/add to set the validation rules for the page.
To load the view files, we have mentioned 2 ways, one by calling the core controller's page_construct function and other by calling default loader view function. These both are used, the page_contruct() is called to load the full page view and the loader view is called to load the modal view.
Developer Guide
class Comments extends MY_Controller {
  function add() {
    // check user permissions
    $this->sma->checkPermissions();
    // validate rules http://www.codeigniter.com/user_guide/libraries/form_validation.html#rulereference
    $this->form_validation->set_rules('comment', lang("comment"), 'required|min_length[3]|xss_clean');
    // Check validation
    if ($this->form_validation->run() == true) {
      // Validation true, perform actions, saving data in array
      $data = array(
        'comment' => $this->input->post('comment'),
        'from_date' => $this->input->post('from_date') ? $this->sma->fld($this->input->post('from_date')) : NULL,
        'till_date' => $this->input->post('to_date') ? $this->sma->fld($this->input->post('to_date')) : NULL,
      );
    }
    // validate again and send data to model
    if ($this->form_validation->run() == true && $this->commnets_model->addComment($data)) {
      // validation was fine and model returned true so set message and redirect
      $this->session->set_flashdata('item', 'value');
      redirect("welcome");
    } else {
    // validation failed or model returned false
      // set input variables, most these are not set and used view files for input
      $this->data['comment'] = array('name' => 'comment',
        'id' => 'comment',
        'type' => 'textarea',
        'class' => 'form-control',
        'required' => 'required',
        'value' => $this->form_validation->set_value('comment'),
      );
      // check errors
      $this->data['error'] = validation_errors() ? validation_errors() : $this->session->flashdata('error');
      // set any other variable to pass to view
      $this->data['modal_js'] = $this->site->modal_js();

      // load view by calling core controller's page_construct()
      $bc = array(array('link' => base_url(), 'page' => lang('home')), array('link' => '#', 'page' => lang('comments')));
      $meta = array('page_title' => lang('add_comment'), 'bc' => $bc);
      $this->page_construct('comments/add', $meta, $this->data);
      // OR load view by calling loader's view()
      $this->load->view($this->theme . 'comments/add', $this->data);
    }
  }
}
Adding Language
Guide to add new language.
- Please create new folder in sma/language/ and name it
yourlanguagename - Folder name should be without space and all lower letters.
- Copy all the files from sma/language/english/ and paste then to sma/language/
yourlanguagename/ - Now you can translate these all file to your language
- Download flag image (format: png, width: 16px, height: 11px) and paste it in assets/images/
- You can add new key to language array. (See Code Section)
Please replace the yourlanguagename with your language For example, spanish, french, chinese etc
Adding Language
To add select option in setting's language
Please open themes/default/views/settings/index.php and search for ( $lang = ) You can replace the default with your theme if you are using different theme. You can add new array key for your language as following:
$lang = array(
		'english' => 'English',
		'yourlanguagename' => 'Your Language Name',
	    );
yourlanguagename must be same folder name that you created in sma/language/
Theme
We are aware that developers always need to modify the base code. Once the update available, their job become difficult to update as they have modify the code for their client needs. This is first step to offer easy modification for developers. Though this only covers the view side. But we will be exploring the ways to offer easy modification for controllers/models side in future.
In V3 you can add your own themes by creating the folder in /themes/. Please make sure there is no space in the folder name. Currently there are 2 folders in /themes/ i. default ii. errors
Errors folder will be the same for all themes and you only need to modify the error file in /themes/errors/html/ (in case you need to modify, most of the times you won't need to modify these error files.)
You theme will have 2 folders, assets and views, assets folder will contain all you css, js and images files and the views folder will contain the view files for page (main content area view).
The main file to modify will be the header.php and footer.php in /themes/yourtheme/views/ as you will set all the styles and javascript code here.
Theme
If you need to have to modify only a few view files, then you can just create only views folder in your /themes/yourtheme/ and copy the view file from /themes/default/ and paste to /themes/yourtheme/ and modify this.
For example, If I need to modify the dashbord view file, I will create a theme folder in /themes/ and name it 'myviews', copy the dashboard.php file from /themes/default/ and will paste into /themes/myviews/ and modify this files as per my needs. I will need to add and set the theme in settings view file as
$themes = array(
		'default' => 'Default',
		'myviews' => 'My Modified View Files'
		);
Once I updated the settings with 'My Modified View Files' as my new theme. The dashboard view file will be loaded from myviews theme and all other those don't exist in the myviews will be loaded from the /themes/default/
Please be informed this rule does not apply to assets folder for any theme. If you have created the assets folder in your theme, system will look all the css, js and images from this folder and if they does not exist, you will get page without any style.
Removing Required
To remove validation, you will need to edit few files
- sma/controllers/sleectTheControllerYouWantEdeit
- themes/default/selectTheAppropriateFolderOrFile
- Database table to accept null value for that field
Please alter the database table to accept the null for your inputs (postal code).
- Open phpmyadmin and select the database
- Select the customers table
- Click Structure
- Click change on field name (city) line
- Tick/check the null checkbox
- Click Save
Now try to add customer without city. You won't get any error as we have remove the required validation for this input.
You can use these steps to remove the required field for any other fields.
Please be careful while removing the required from some fields as these might be used in other modules, like removing the required validation for email to accept customer with no email could cause issues/errors for emailing the invoice to customer in sale/pos.
Removing Required
Let say we want to remove the restriction from postal code from add customer
Open sma/modues/customers/views/add.php and look for city input code
<?php echo form_input('city', '', 'class="form-control" id="city" required="required"'); ?>We need to remove the required (you might need to check pattern) attributes. We will delete the code below
required="required"You need to check the validation rules in sma/config/form_validation.php We are validation
if ($this->form_validation->run('companies/add') == true) {so search 'companies/add' array and then look for array with field 'city' and remove the required from rules and now your rules will be as
'rules' => 'xss_clean'For some pages, you need to check the rules in controller as sma/modues/customers/controllers/customers.php and look for function add() and see the validation line on top as
$this->form_validation->set_rules('city', lang("city"), 'required|xss_clean');Remove the required from last part of the validation. After this our validation line will look as
$this->form_validation->set_rules('city', lang("city"), 'xss_clean');Add/Remove column to table
Here are thing to step to follow
- Modify the select statement and select the desired column, in the controller.
- Add new element to datatables aoColumns (should be in sequence).
- If you need to add footer filter then to dtFilter.
- Lastly add the th tag with column heading to table head and table foot (should be in sequence).
These will be the step for add any new column on any listing page.
To remove a column you will need to
- Modify the select statement and remove the desired column, in the controller.
- Remove the element form aoColumns of datatables.
- If there is table foot filter, please remove it from dtFilter too.
- Lastly Remove the th tag with column heading to table head and table foot.
I am adding the code to add the new column (state) on the customer list page and there won't be code to remove the columns but you can follow the step above.
Add new column to table
1. Open then sma/controllers/customers.php and look for the select statement in getCustomers() and add state after city
->select("id, company, name, email, phone, city, state, customer_group_name, vat_no, award_points")2. Open the themes/default/views/customers/index.php and look for aoColumns and null as 7th element
"aoColumns": [ {"bSortable": false, "mRender": checkbox}, null, null, null, null, null, null, null, null, null, {"bSortable": false}]3. Let's add column filter we will be adding for column number 6 the 7th element if start from 1 for array 0. Please don't forget to increase the column number for other columns that are after this.
{column_number : 6, filter_default_label: "[<?=lang('state');?>]", filter_type: "text" },
{column_number : 7, filter_default_label: "[<?=lang('customer_group');?>]", filter_type: "text" },
{column_number : 8, filter_default_label: "[<?=lang('vat_no');?>]", filter_type: "text" },
{column_number : 9, filter_default_label: "[<?=lang('award_points');?>]", filter_type: "text" },
Array element start from 0 so the 7th element number will be 6 in the array.
4. Let's add th tag to table head and foot by add the line below after the th tag city for city.
<th><?= lang("state"); ?></th>Sorting Tables
We have used datatables library for all listing tables. If you need to change any table sorting column, you will need to modify the view file.
The first column of the table will start from index 0 and then increase 1 with each columns. Let say you want to sort the table with 4th column then you will need to use index 3 as "aaSorting": [[3, "asc"]],
You can change the sorting for any table by modifying the files as described here.
Sorting Tables
For example, if you need to change the sorting for customers, you will need to edit the /theme/default/customers/index.php and search
"aaSorting": [[1, "asc"]],This is being sorted for 2nd table column, If you want to sort it by id (1st table column) then you will need to change as
"aaSorting": [[0, "asc"]],You even can sort the table with multiple columns as
"aaSorting": [[0, "asc"], [1, "asc"]],Barcodes and Labels
These pages are designed to be printed with desktop laser printers. Barcode sheet or barcode pages have 2 columns' table (2 product per row and medium barcode image with 60px height) while labels have 4 columns' table (4 products per row and small barcode image with 30px height).
If you need to modify any of the barcode/lable page to show/remove any information, you can do so by modify the products controller. The functions are mentioned that handle the pages.
If your products have variants, only single product barcode/label printing will show the product barcode images with variants id. To directly add the option to order list (either from product detail page or from the row actions).
Barcodes and Labels
Functions/Methods handling the barcodes and labels pages are
single_barcode()- Handles barcode printing for single productssingle_label()- Handles label printing for single productsprint_barcodes()- Handles barcode printing for multiple products based on categoryprint_lables()- Handles lebel printing for multiple products based on categoryproduct_actions()- Handles barcode and label printing for multiple selected products
File: sma/controllers/products.php